Posted by: Michael Hall 4 years, 6 months ago
Share on Twitter Share on Facebook(Comments)
A lot of of us have a Raspberry Pi, many of us have more than one, and some have probably an excessive amount. And who can blame us? A micro-computer that you can plug regular USB peripherals into, has HDMI out, wireless networking (on later models), low power consumption and can run your favorite Linux distro, all for just $35? Frankly it’s amazing we don’t all have more than we do. But what are we doing with them?
In recent purely non-scientific Twitter poll I asked my followers just that: What are you using your RaspberryPi for? Not surprisingly some people are running a Linux desktop on them, and several are running fun or useful software on them like PiHole, RetroPi, or even just as a mini file server. But only about 20% of the people who responded were making use of one fantastic thing about the Pi: It’s GPIO pins. In fact, most people (35%) said their Pi was just sitting on a shelf not doing anything!
Well my friends, nothing makes this foodie nerd sadder than a wasted Pi. So blow the dust off that little board of yours and grab some LEDs or whatever sensors you might have, because in 10 minutes we’re going to turn that shelf decoration of yours into a functional smart IoT device!

EdgeX for IoT Edge
There are a lot of open source projects for hacking on your Pi, but today I’m going to focus on the EdgeX Foundry, a Linux Foundation/LF Edge project. While not specifically developed to run on the Pi (EdgeX was designed for large-scale industrial IoT use), its micro-service architecture and device SDKs make it easy to deploy at any scale, and flexible enough to be used for the custom IoT device that we’re going to build.
EdgeX is, as the name implies, made for Edge Computing. What is Edge Computing you may ask? It’s a way of putting software that deals with real-world data closer to the real-world so it can process it faster, and at a larger scale
Running EdgeX
In this guide we’re going to run an EdgeX Device Service on our RaspberryPi, and the rest of the EdgeX services on your desktop/laptop. You can run all of EdgeX on the Pi, but to do that you need a 64 bit OS (to run MongoDB), which rules out using the standard Raspbian OS. So to keep things simple we’ll split the services up.
For this tutorial we are going to use the pre-made Motion Detector example from the EdgeX RaspberryPi Device Service project.
Launching EdgeX in Docker
This example project comes with a docker-compose.yml file which will launch all of the EdgeX Foundry services, as well as the NodeRed service which will provide the dashboard and control logic for the example, and Mosquitto to provide an MQTT connection between EdgeX and Node Red.
To launch these services, copy the docker-compose.yml file to your desktop machine, and in the same directory run
docker-compose up -d
This will bring up all of the docker containers (downloading images from Docker Hub as necessary) and will run them all as background daemons (the -d option).
Configuring NodeRed
The above command will start Mosquitto and NodeRed, but they still need to be configured to talk to the EdgeX services. The next steps are to connect EdgeX to Mosquitto, and then to connect Mosquitto to NodeRed.
For the first step, the Motion Detector example provides a script which you can run on the same machine as your EdgeX Foundry services which will register a new Export Service for your Mosquitto instance:
./register_mqtt_export.sh
The second step needs to be done in the NodeRed dashboard, which you can access from http://localhost:1880/ (substituting localhost with the IP of the machine running the NodeRed docker service if it’s a different machine). From there you can import the flow file `motion_detector_flow.json` which is also provided in the Motion Detector example folder.

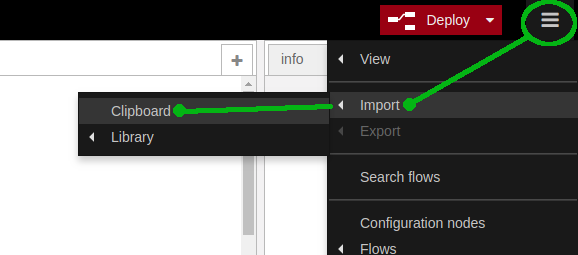

This will not only connect NodeRed to Mosquitto, it also contains the logic to turn the LEDs on and off in response to data coming from the motion sensor (more on that just below). Click the Deploy button at the top of your Node-Red screen to start using this new flow.
Now that your connection between EdgeX and NodeRed is complete, and it’s time to start the RaspberryPi Device Service.
Installing the RaspberryPi Device Service
Setup your RaspberryPi
This tutorial expects that you are using the latest stable version of Raspbian on your Pi. If you already have some other Linux distro on there you should still be able to follow along, but might need different commands to install all of the dependencies.
Install dependencies
The first thing you’ll need to do is install some build dependencies. Don’t worry, you won’t be writing any code, you just need them to build the EdgeX RaspberryPi Device Service. On Rasbian (or Ubuntu) you can do that with:
sudo apt install git cmake curl g++ libcurl4-openssl-dev libmicrohttpd-dev libyaml-dev uuid-dev
You will also need `libcbor-dev`, which will be in newer releases of Raspbian, but for now we need to fetch it manually:
wget http://ftp.us.debian.org/debian/pool/main/libc/libcbor/libcbor0_0.5.0+dfsg-2_armhf.deb
sudo dpkg -i libcbor0_0.5.0+dfsg-2_armhf.deb
wget http://ftp.us.debian.org/debian/pool/main/libc/libcbor/libcbor-dev_0.5.0+dfsg-2_armhf.deb
sudo dpkg -i libcbor-dev_0.5.0+dfsg-2_armhf.deb
Building the Device Service
Now we have everything needed to build the EdgeX RaspberryPi Device Service, except for the code for that service itself. We’ll get that from Github:
git clone https://github.com/mhall119/edgex-device-rpi
cd edgex-device-rpi
Building the service takes two steps. First, build the dependencies:
sudo ./scripts/build_deps.sh
This command will download and build both the libmraa and device-c-sdk libraries needed to build the edgex-device-rpi executable.
Next, build the binary itself:
./scripts/build.sh
If everything went according to plan, you should now have a binary in `./build/release/device-rpi`
Connecting your RaspberryPi
The RaspberryPi Device Service can be used to read and write from anything you have connected to your Pi’S GPIO pins. To run the Motion Detector example you will need a passive infrared (PIR) sensor, a couple of LEDs, and two 220ohm resistors (optional, but they protect your LEDs).
(Hint: If you don’t have a PIR sensor, try the Blink example instead.)
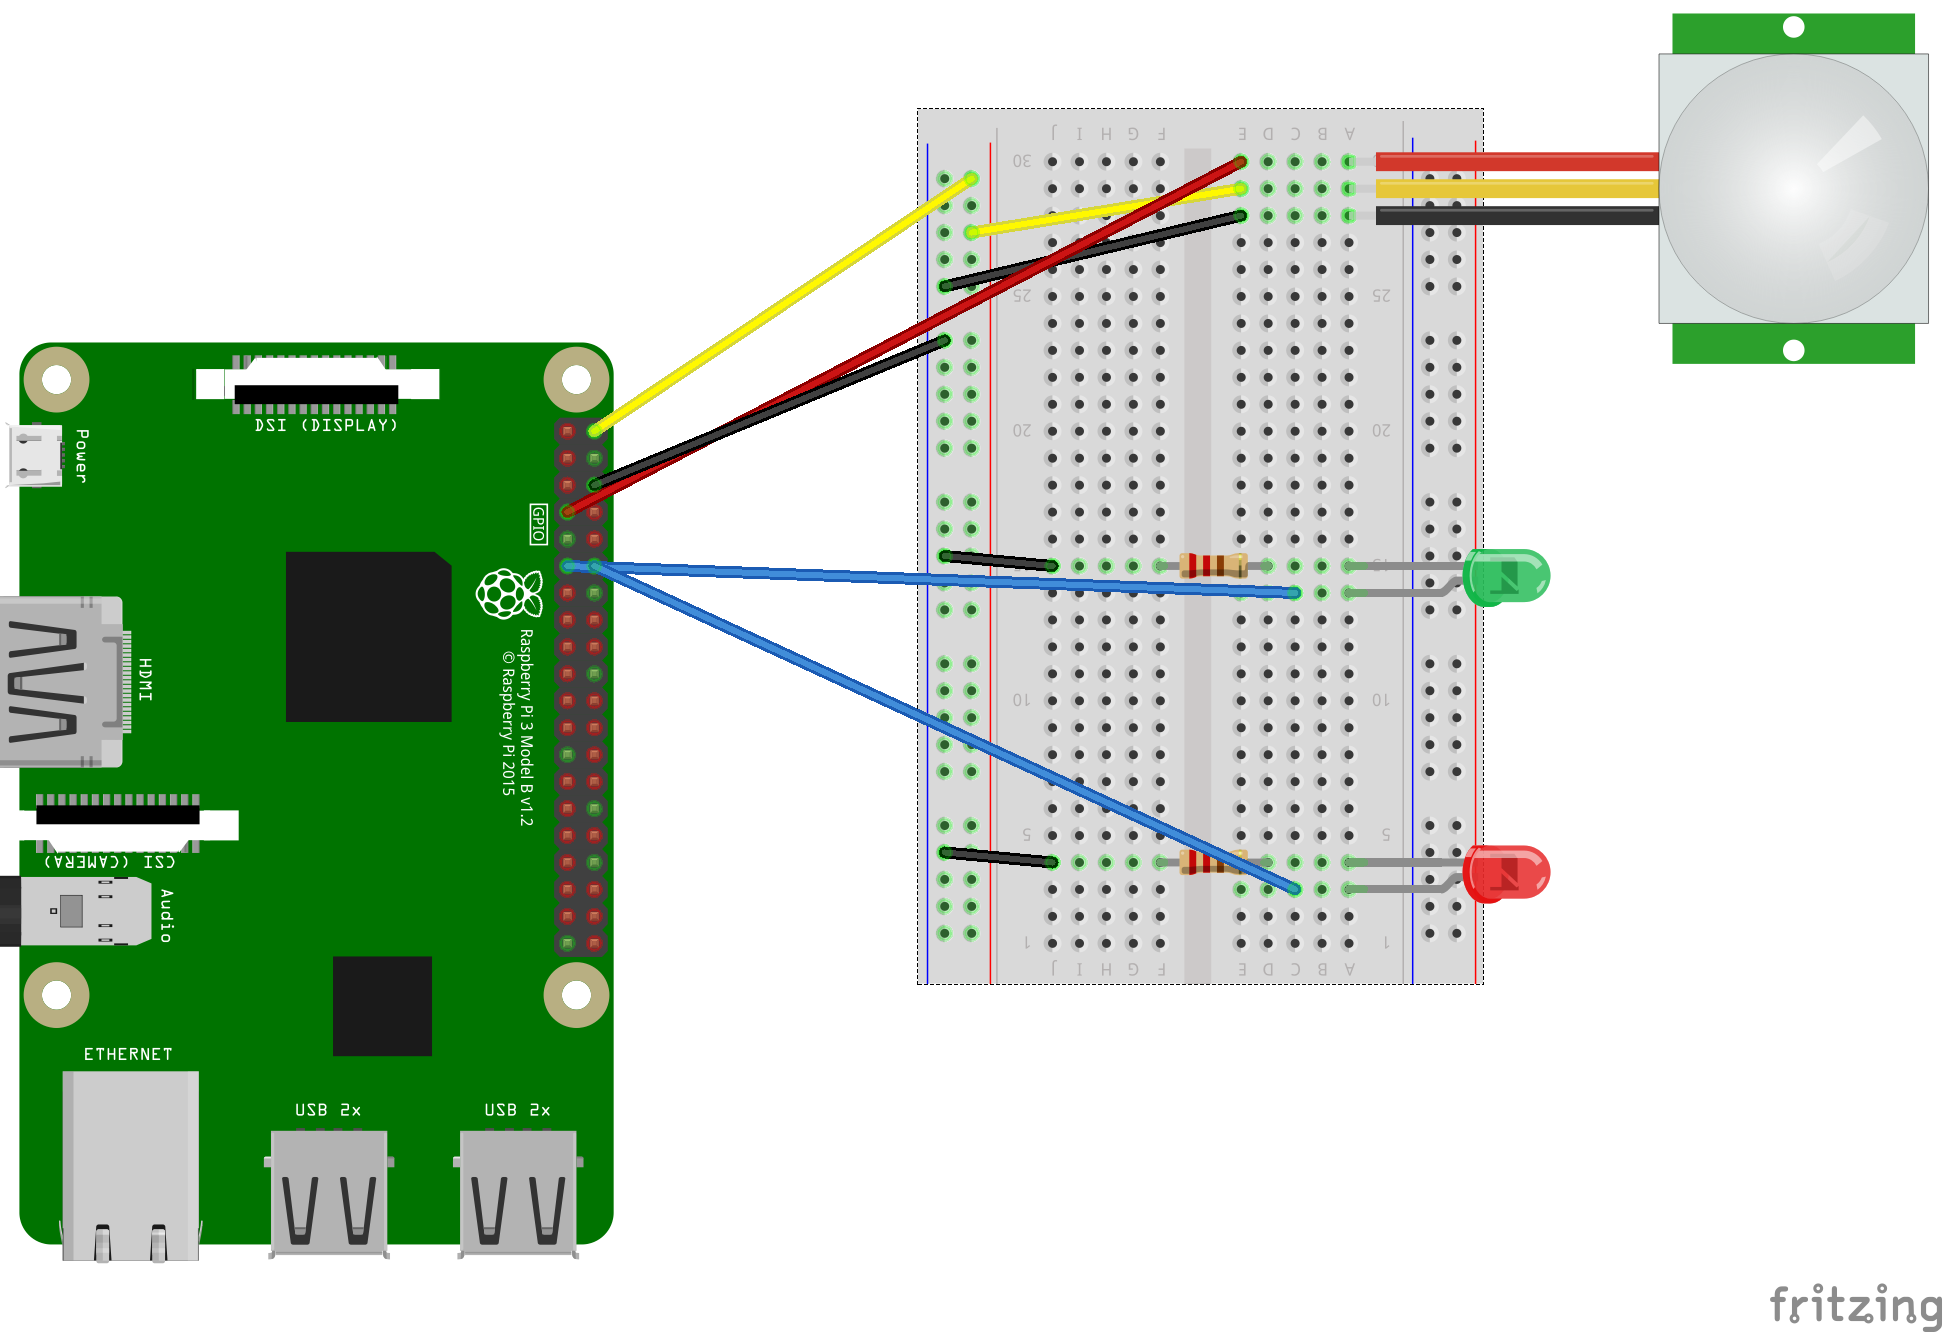
Connect your Pi to the PIR sensor and LEDs as shown below
- Make sure that the PIR sensor is connected to the 5v pin and not the 3.3v pin on the Raspberry Pi.
- The output pin on the PIR should be connected to pin #7 on the Raspberry Pi.
- The Green LED should be connected to pin #11 on the Pi, and the Red LED connected to pin #12.
- The ground rail on your breadboard is connected to the one of the gnd pins on the Raspberry Pi.
Defining your custom device
Now that you have your sensors connected to your RaspberryPi, we need to tell EdgeX about it. In EdgeX, a Device Profile is used to describe a device’s capabilities, both data that can be read from it, and activation commands that can be sent down to it. It also lets you give additional information to the Device Service itself about how to communicate with the Device.
We are going to take advantage of all of those Device Profile capabilities to describe the sensors and connections we just made. Since we are using the Motion Detector example, we will use the pre-defined device profile for it. There’s nothing you need to do here, but let’s take a look at it anyway:
In the deviceResources section you will see that we have defined, the two LEDs and a MotionState parameter. Notice also that each of these has a set of attributes, including Pin_Num and Type, which are how we tell the Device Service which pins to read or write from to access those resources. You can connect any lights, sensors, or other electronics you want to your Pi, simply by defining which pins they are connected to and whether they are an input or output.
deviceResources:
- name: Green_LED
  description: "Turn the Green LED to On/Off"
  attributes:
    { Pin_Num: "11", Interface: "GPIO", Type: "OUT" }
  properties:
    value:
      { type: "Bool", readWrite: "RW", size: "1", minimum: "0", maximum: "1", defaultValue: "0" }
    units:
      { type: "String", readWrite: "R", defaultValue: "Enabled/Disabled" }
The next section is deviceCommands, which is where we expose the internal deviceResources to the rest of EdgeX. Since we are going to expose everything, you see a command defined for each resources.
deviceCommands:
- name: Set_Green_Led
  set:
  - { operation: "set", object: "Green_LED", property: "value", parameter: "Green_LED" }
The final section lets us tell EdgeX what parts of the device can be exposed to applications. We do that by defining coreCommands and the API for accessing them. These last two sections might feel a little redundant, but that’s only because our simple use case is exposing all of our sensors directly. In a real world example there would be bigger differences betweent these sections.
coreCommands:
- name: Set_Green_Led
  put:
    path: "/api/v1/device/{deviceId}/Set_Green_Led"
    parameterNames: ["Green_LED"]
Running the RaspberryPi Device Service
By default, EdgeX services will look for each other on the same host (localhost). This is true even for device services written with the SDKs, such as the RaspberryPi device service we’re using. So, because we’re running our device service on a different machine than the rest of EdgeX, we will need to tell is where to find those other services that it needs, and also tell those services where to find it.
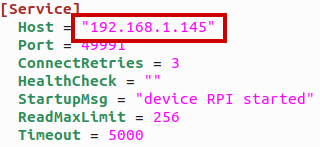
To do that, open the configuration.toml on your RaspberryPi and make the following changes:
At the top of the file, replace the Host property with the IP address of your RaspberryPi
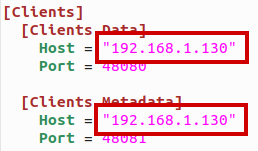
In the [Clients] section, update the Host properties for Data and Metadata with the IP address of the machine running the EdgeX services you started in the first step.
Then you can start the device-rpi service on your RaspberryPi using using the MotionDetector example:
./build/release/device-rpi --confdir ./examples/MotionDetector
Watch it go!
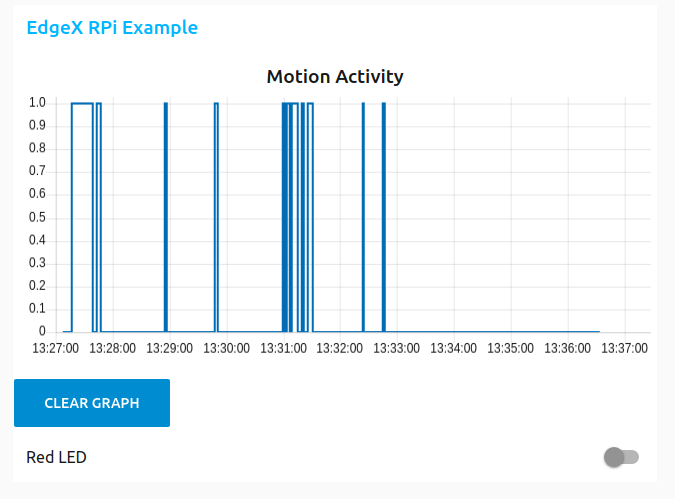
You will now have a Node-Red dashboard at http://localhost:1880/ui/ where you can watch motion events come in and also control the Red LED on your board.
Recent Posts
- Time Series Tech Stacks for the IoT Edge
- Before You Take Your Conference Online
- Joining InfluxData and the future of time-series data
- Turn your RaspberryPi into an Smart IoT Device, no coding required!
- Joining the Linux Foundation
Archive
2021
- October (1)
2020
- April (1)
2019
2018
2017
2016
2011
- February (1)
Categories
- Archive (11)
- Community (1)
- EdgeX Foundry (1)
- Influx (2)
- IoT (3)
- Linux (1)
- Linux Foundation (2)
- Planet Ubuntu (1)
Authors
- Michael Hall (17)
Comments